Invite Members to your Project
PICO Portal is a tool that provides collaborative and systematic review ability to its users. You can start a new project and add members to the projects. These members can be assigned one or more roles, such as Reviewer, Judicator, Assistant, Librarian, or Viewers. Based on their role, they can review or perform other necessary actions.
User Roles
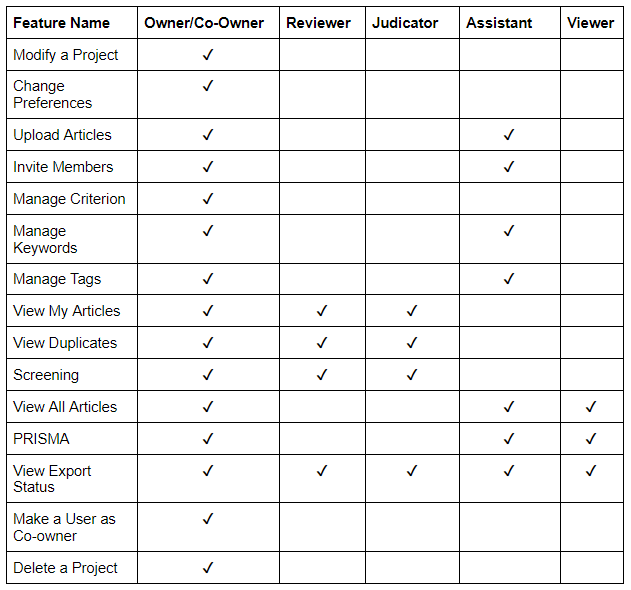
There are multiple roles in PICO Portal based on which you would be able to view certain tabs or use certain features. You can assign one or more roles to a user. For example, a user can be an assistant and a reviewer as well.
The following table provides a list of permissions allowed for a user based on the assigned role.
Owner
As the name suggests, the owner of the project is the one who creates a new project. By default, the Owner can perform all the functions in the project. In addition, the Owner has both the roles, reviewer and a judicator. These roles can not be changed. The behavior will be similar to a user who has a dual role. For example, the Owner will first have to review all the citations, and once completed, the Owner will then perform the responsibilities of a judicator.
If an owner wants to have a single role, such as a reviewer, then in such a case, we recommend that the Owner register with a different email address and assign the required role.
PICO Portal provides access to the following menu options to an owner.

Co-Owner
An Owner of the project can add a user and make them a Co-owner of the project. A co-owner has the same privileges as the owner of the project. However, a Co-owner does not have the right to delete the project.
Reviewer
A Reviewer is a user added by an owner or co-owner and has been assigned the role of a Reviewer. A reviewer can perform the following functions:
- Review citations in Abstract and Full-Text review stage in a single review, dual review, or a custom review
- Screen possible duplicate citations. However, the confidence for such screened articles is low and required other reviewers to screen.
- Include or exclude citations after performing a review. While excluding, select P, I, C, O, S, Non-RCT, Duplicate, or any other custom reasons for exclusion. The reviewer can also exclude a citation without specifying a reason.
- Modify their review decisions, as long as other reviewers or the judicator have not reviewed the citation. If any other reviewer has reviewed the article, then the decision can not be changed. PICO Portal records the decision when the reviewer selects the outcome (include/exclude) and navigates to the next citation.
- Select a number of citations per set to review. The available options are 40-60-100, where 40 means a set of 40 citations, and so on. Once the screening of the set is completed, the user will be prompted to review a new set of citations.
- View other reviewer’s decision, primarily for training purpose only
PICO Portal provides access to the following menu options to a reviewer.

Judicator
A Judicator is a senior reviewer who provides the final consensus on the citations available in the project. A judicator can perform the following functions.
- Review all/any citations in the project
- Screen conflicting articles in cases where two or more reviewers don’t have identical screening decisions. For example, in a dual review, Reviewer 1 may choose to include a citation, and Reviewer 2 may choose to exclude the same citation based on Population. In such a case, this citation will be marked as a conflicting citation, which needs to be reviewed by a judicator. In a full-text review, if the reviewers have excluded the citation for different reasons, then it will be considered as a conflict.
- Provide final consensus on conflicting articles. Once the judicator screens the citations, and the screening results are being saved, the article is considered as a completed article and will be moved from Pending to Include or Exclude category.
- Include or exclude citations after performing a review. While excluding, select P, I, C, O, S, Non-RCT, Duplicate, or any other custom reasons for exclusion. The reviewer can also exclude a citation without specifying a reason.
PICO Portal provides access to the following menu options to a judicator.

Assistant
An Assistant is a user who performs administrative tasks for the owner. Assistant has a very limited role and can perform the following functions to assist the owner:
- Upload citations from various sources
- Invite users to the project
- Add and manage keywords
- Add and manage tags
- View articles
- View PRISMA
- View export status
PICO Portal provides access to the following menu options to an assistant.

Viewer
A Viewer is a third-party stakeholder, a client, or someone in the team who needs to view all the citations in the project. A Viewer can only view and filter citations and can review the PRISMA. Viewers do not have the right to screen the articles, provide final consensus, or make any other modifications to the project.
If a user has a dual role, such as a Reviewer and a Viewer, then such a user can screen the articles and also review the PRSIMA.
PICO Portal provides access to the following menu options to a viewer.

Add Members to a PICO Project
PICO Portal is a tool that provides collaborative and systematic review ability to its users. You can start a new project and add members to the projects. These members can be assigned one or more roles, such as Reviewer, Judicator, Assistant, or Viewers. Based on their role, they can review or perform other necessary actions. For more information about the different users and their rights, refer to the Users and Permissions page.
After you send an invite, the recipient is required to accept the invitation. Once the recipient accepts the invitation, the project will be visible to them on their Project Dashboard.
Perform the following steps to add a new member and assign a role:
- On the PICO Portal homepage, a list of all the projects appears. In the above example, we created a new project.
- On the homepage, click the project name and click the Settings > Invite button on the project homepage. The Project Team Members page appears.
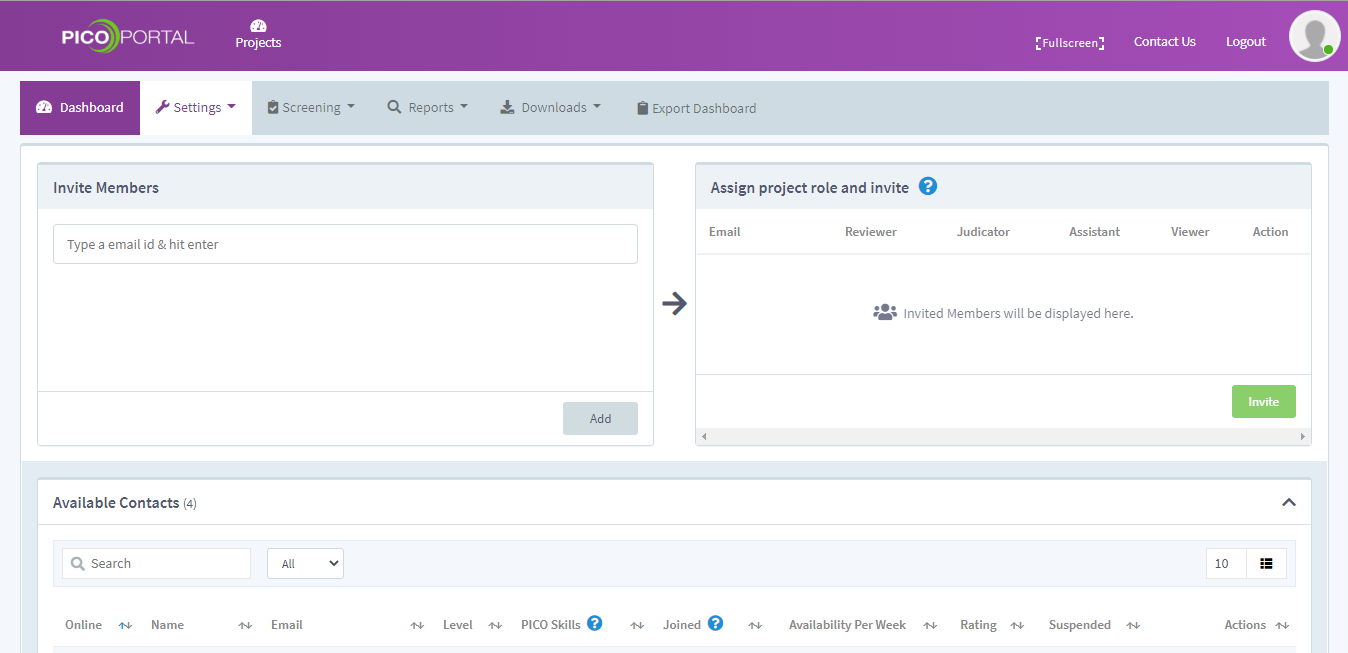
- In the Invite Members section, type the email address of the members whom you want to invite. You can type multiple email addresses in the field.
- After you have added the required emails, click the Add button. The emails are added and appear in the Assign project role and invite section where you can now assign roles to the members and send invites.
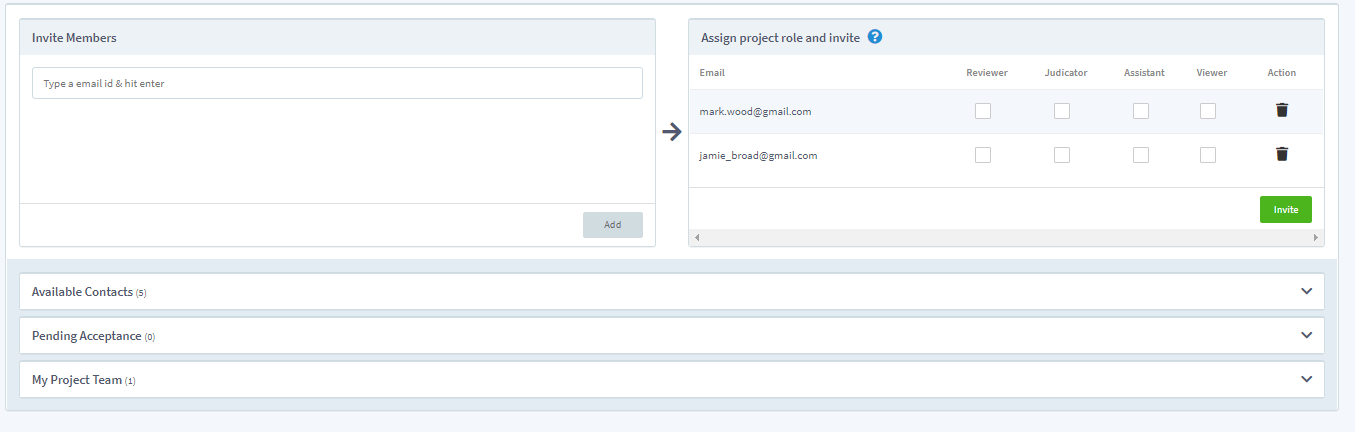
- In the Assign project role and invite section, select the appropriate role. For example, if you want the member to be a reviewer in the project, then select the Reviewer check box. Similarly, based on the role you want to assign, click the appropriate check box.
- After you have selected the required roles, click Invite.
An email is sent to the member to accept or reject the invitation. If the member accepts the invitation, the member is redirected to the PICO Portal. The member can log in or create a new account as required. If the member rejects the invitation, the member is redirected to the PICO Portal and is prompted to provide a reason for rejecting the invitation.
Pending Acceptance
The Pending Acceptance section displays a list of all the members whom you have invited and the acceptance is pending on them.
You can send a reminder or delete the invitation. The Status and the Reason columns are updated when the member accepts or rejects the invitation. In case if a member does not receive the invite, you can copy the invite from PICO Portal and send them a request.
To manually send an email to the member, click the Copy Project Invitation icon and copy the invite from the dialog box. Once you copy the invite, you can email the member personally from your email box.
Manage Members
If a member accepts the invitation, the member is added to the My Project Team section. The Edit icon allows you to edit the member role or make them co-owner of the project. You can also suspend a member by selecting the check box in the Suspended column.
Changing a User Role
Consider a scenario where you want to change a member from being a Reviewer to a Judicator. You can modify the roles as and when required by performing the following steps.
- Navigate to the required project and click Settings > Invite. The Project Team Members page appears.
- Scroll down and expand the My Project Team section. A list of all the existing members appears.

- Click the Edit icon next to the member that you want to modify. The Assign Project Roles dialog box appears.
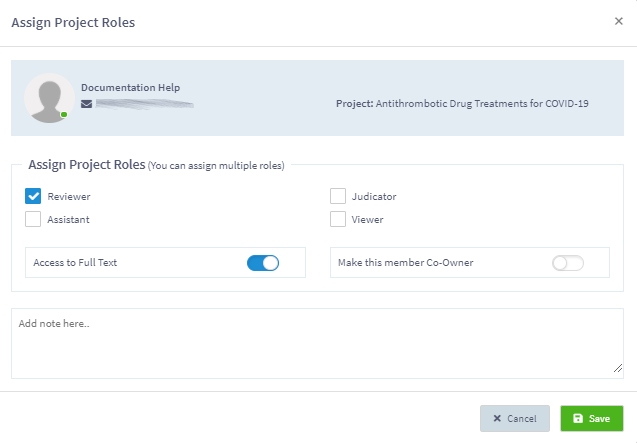
- In this case, the user is already a reviewer. If you want to change the user from being a Reviewer to Judicator, then clear the Reviewer check box and select the Judicator check box. If you want to make the user a co-owner of the project, toggle the Make this member Co-owner button.
- After you have made the modifications, click Save.
Suspending an Existing Member
If you want to temporarily suspend a member from the project, you can do it without deleting the member from the project. Perform the following steps to suspend a member.
- Navigate to the required project and click Settings > Invite. The Project Team Members page appears.
- Scroll down and expand the My Project Team section. A list of all the existing members appears.
- For the member whom you want to suspend, select the check box next to the member. The check box is available under the Suspended column.
- In the Suspend My Tea Member confirmation box, click Submit to suspend the member.
Once you suspend a member, you will not be able to modify any details of the member. You can unsuspend the member by clearing the check box under the Suspending column. The member will be unsuspended and back in the project.
Deleting an Existing Member
If you do not want a member to be part of the project, you can delete them by navigating to the Project Team Members page and clicking the Delete icon next to the member in the My Project Team section.
note
An owner, a co-owner, or an assistant can only add, modify, or delete members from the project.