Change Project Preferences
The Preferences page allows you to configure the following for your project:
- Modify project settings
- Add and manage exclude reasons
To access the project preferences, click Settings > Preferences button.
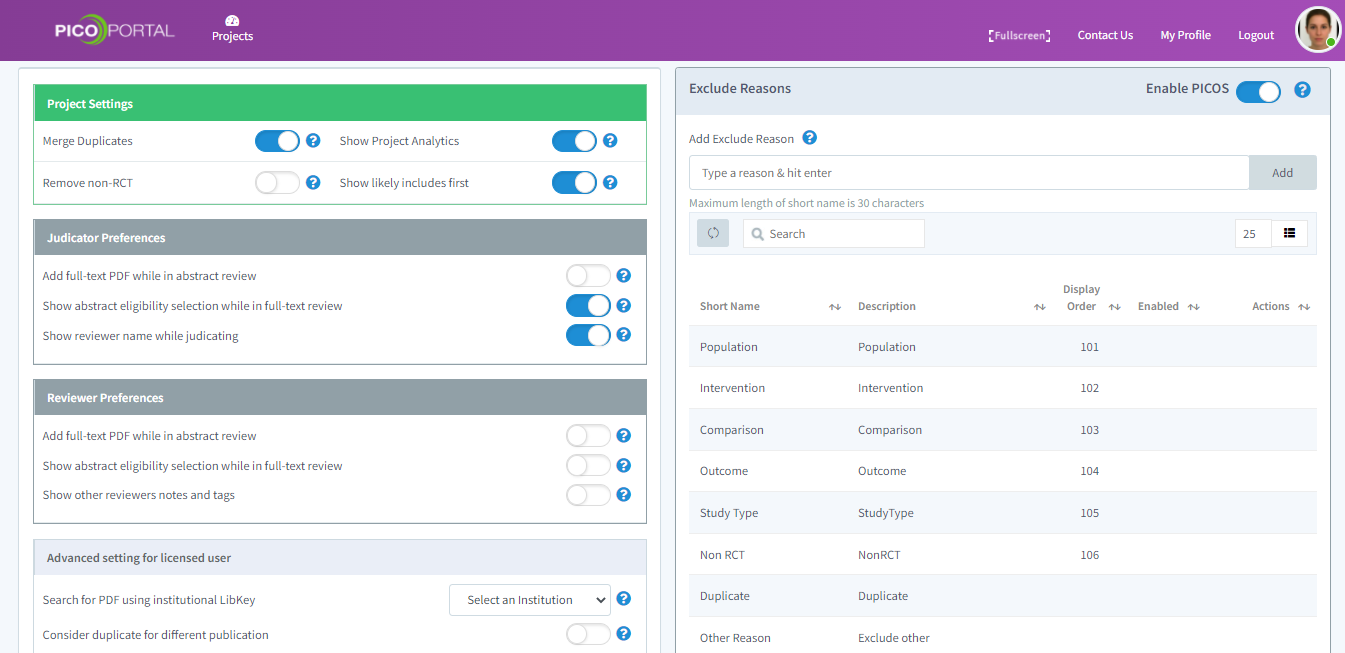
Project Settings
The Project Settings section in the Preferences page allows you to customize your project.
Merge Duplicates
When you upload citations from multiple sources in your project, PICO Portal automatically crawls through each citation and identifies the duplicates. After identification, the duplicate citations are merged. This is the default behavior of PICO Portal as it helps in saving time and efforts of manually identifying and merging duplicates.
However, if you want to disable the automatic merging of duplicate citations, then toggle Merge Duplicate.
Remove Non-RCT
If you want to remove non-RCT citations from screening, you can toggle the Remove Non-RCT option on the Preferences page. When enabled, PICO Portal will remove all the non-RCT citations.
Show Project Analytics
User analytics provides detailed insights into the user reviewing activity. When enabled, the analytical information appears on the dashboard. Toggle the Show Project Analytics button to enable or disable the option.
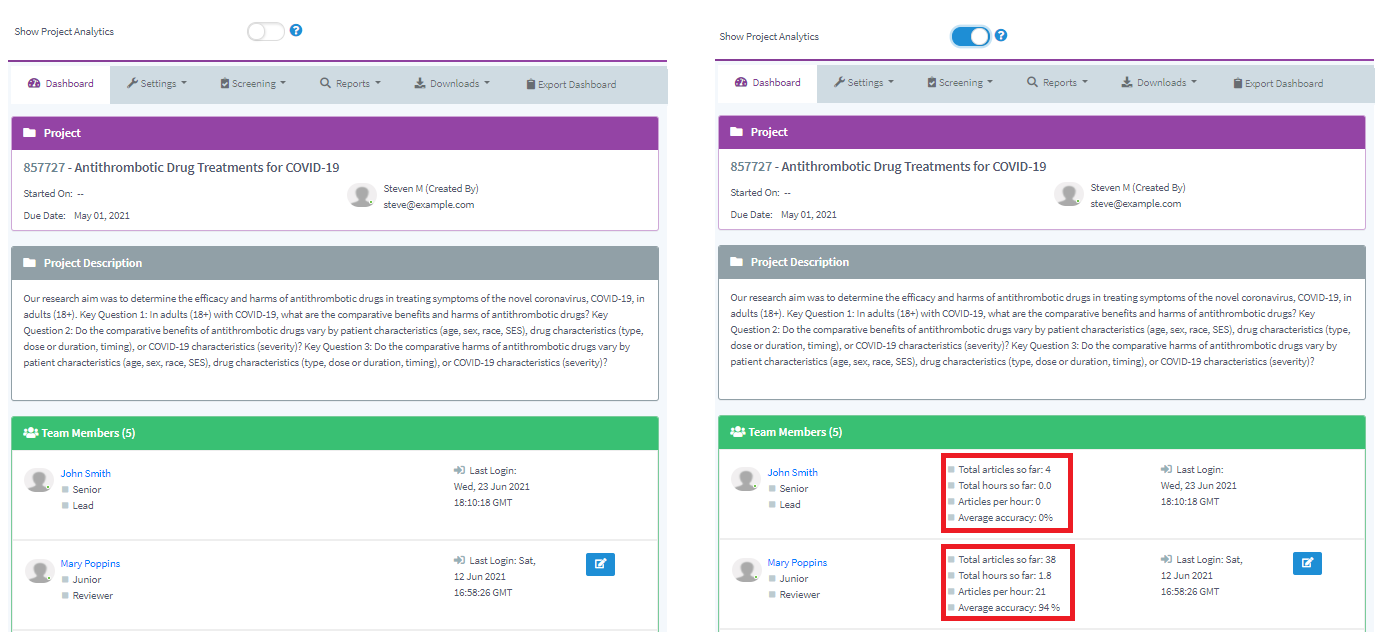
note
These metrics are available only to the Project Lead/Owner. Reviewers, Judicators, or other team members will not be able to see the statistics. Individual users can view their analytical/performance metrics on the My Articles page.
Show likely includes first
As you screen the articles, PICO Portal AI Screening module learns and begins to display the most likely includes citation making the screening process efficient. If the option is not enabled, PICO Portal displays the citations in a random order.
Judicator Preferences
This section provides options to modify judicator preferences.
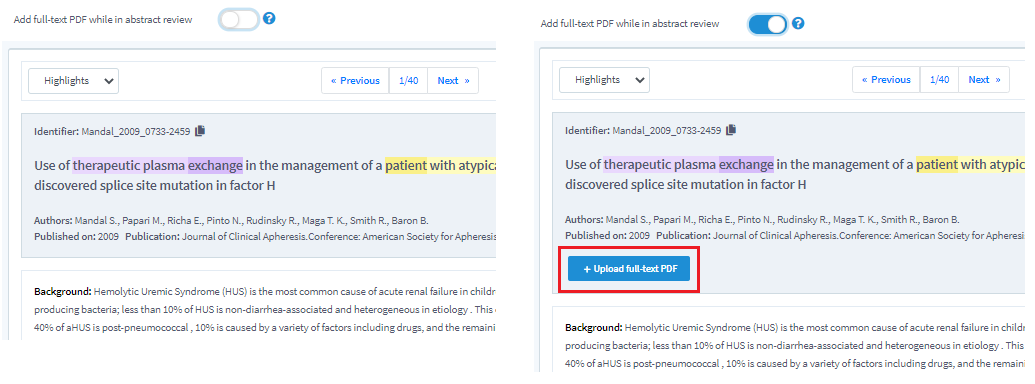
Add full-text PDF while in abstract review
While handling disagreements during abstract review, you can allow or block a judicator to upload a full-text PDF to the citation. Full-text PDFs help in screening citations during Full-Text screening. If you enable the Add full-text PDF while in abstract review option, the judicator will be able to upload full-text PDF during abstract review.
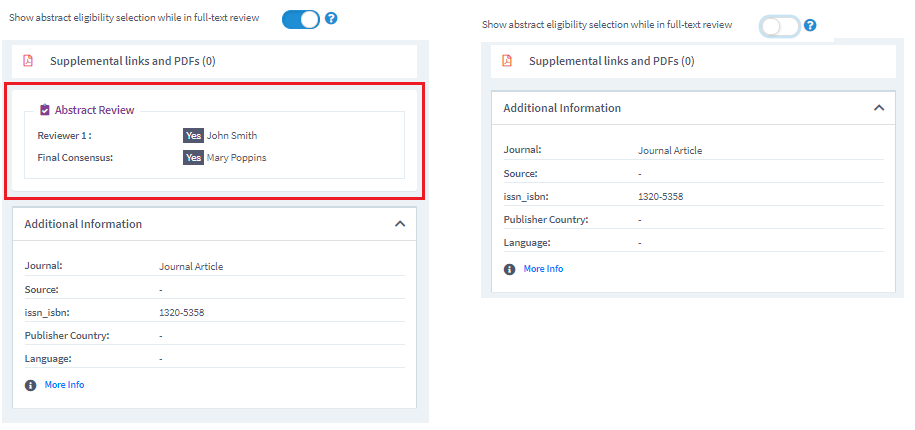
Show abstract eligibility selection while in full-text review
When the reviewers complete the full-text review, the Judicator provides the final consensus in case of conflicts. By default, PICO Portal displays the abstract results of the reviewers during full-text screening. However, if you want to hide or display the abstract review results, then you can toggle the Show abstract answer to the Judicator while full text review button on the Preferences page.
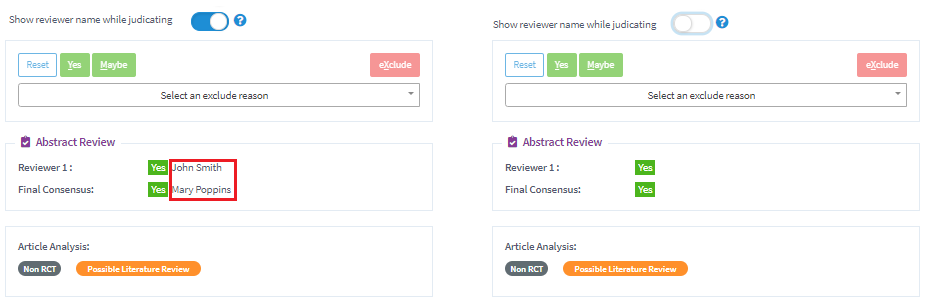
Show reviewer name while judicating
When a judicator is reviewing conflicting citations, the reviewer names and their selection is displayed to the judicator. To ensure unbiased judication, you can disable the Show reviewer name while judicating option. When disabled, the reviewer names will not be displayed to the judicator.
note
If a user is assigned the role of a reviewer and a judicator both, then while judicating, the user will be able to view the reviewer names, even if the Show reviewer name while judicating is disabled.
Reviewer Preferences
This section provides options to modify reviewer preferences.
Add full-text PDF while in abstract review
While performing an abstract review, you can allow or block a reviewer to upload a full-text PDF to the citation. Full-text PDFs helps the reviewer screen citations during Full-Text screening. If you enable the Add full-text PDF while in abstract review option, the reviewer will be able to upload full-text PDF during abstract review.
Show abstract eligibility selection while in full-text review
After completing abstract screening, the reviewer performs full-text screening on the included citations. By default, PICO Portal displays the abstract results of the reviewers while doing full-text screening. However, if you want to hide the results for all the reviewers, then toggle the Show abstract eligibility selection while in full-text review button on the Preferences page.
Show other reviewers notes and tags
Enable this option if you want show other reviewers notes and tags. For example, if the option is disabled, Reviewer 1 will not be able to see the notes and tags that Reviewer 2 has added for the citation, and vice versa. However, if this option is enabled, both reviewers will see each others notes and tags.
Advanced setting for licensed user
This section provides options to modify options available for deduplication and LibKey.
Search for PDF using institutional LibKey
Allows you to select the name of the university to apply library provider to find DOI PDF using the provided credentials.
Consider duplicate for different publication
If this option is enabled, PICO Portal will mark the articles from the same publication, journal, and date as duplicates.
Managing Exclude Reasons
When you exclude an article during an abstract review or a full-text review, you are required to select a reason for the exclusion. By default, PICO Portal provides predefined reasons that are available during the review. In addition, it also allows the project owner to add and manage new exclusion reasons and set the display order.
The exclude reasons appear while you are screening citations on the Screenings page as shown below.
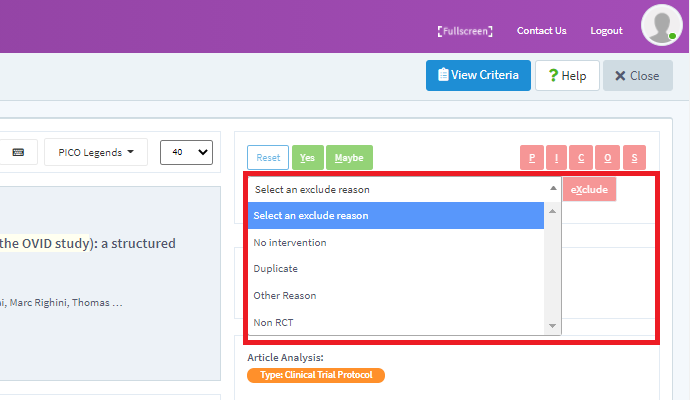
To manage exclusion reasons, navigate to Settings > Preferences > Project Settings > Exclude Reasons section. The Exclude Reasons section allows you to perform the following:
- Enable or Disable PICOS
- Add new exclude reasons
- Search existing reasons
- Edit new custom reasons
- Change the display order of custom reasons
Enable PICOS
While performing an abstract or a full-text screening, you can exclude the citation by selecting the available options as shown below.
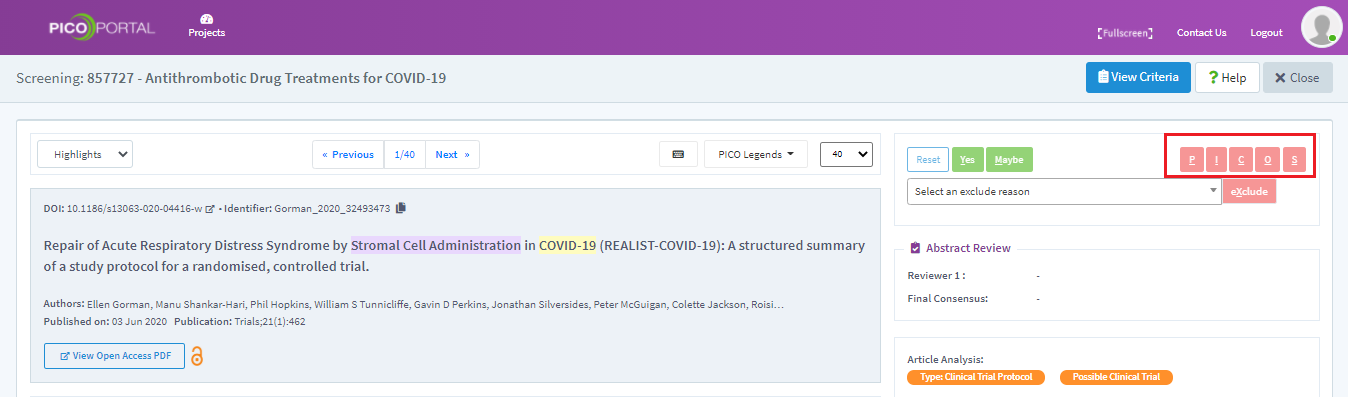
The most commonly used P, I, C, O, and S reasons are available as buttons for you to quickly select and exclude the citation. However, if you do not want to use these reasons, then disable the Enable PICOS option. This will remove the PICOS option during the screening process.
Add New Exclude Reason
Adding a new exclude reason is simple. You just have you type the reason in the above-highlighted box available in the Preferences tab. If you want to add multiple reasons at once, you can do that by pressing the TAB button, adding a comma, or pressing the ENTER button after you add the reason. After you have added all the reasons, click Add.
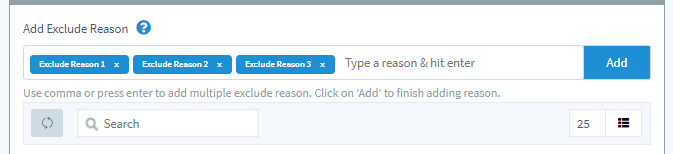
If you want to remove a reason before adding them, click the x icon available next to the reason.
Modify New Custom Reasons
When you add new reasons, the reason does not have a description or display order assigned to it. For example, we have added multiple exclude reasons in the above step.
PICO Portal does not allow you to edit the predefined exclusion reason as shown in the above image. The reasons that you add can be modified.
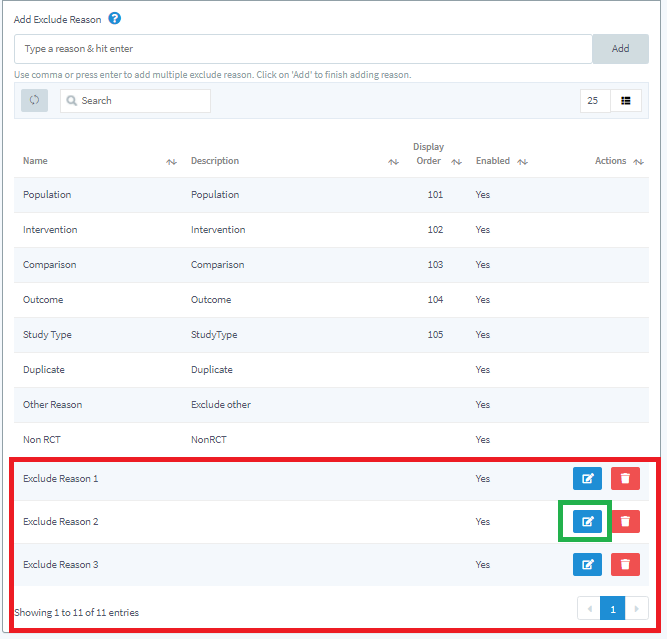
To edit the reason, click the Edit icon available next to the exclusion reason.
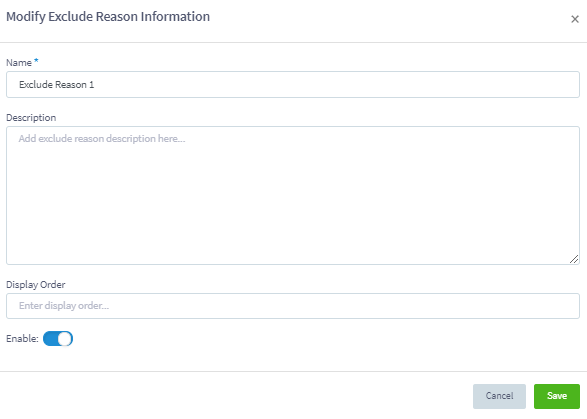
The Modify Exclude Reason Information screen provides the following options:
- Name: Displays the name of the reason. This name appears as exclude reason to the reviewer and the judicator while screening the articles.
- Description: Allows you to provide a meaningful description for the reason. When you add a description for the exclude reason, the description appears as a tool tip when the user hovers on the exclude reason during the screening process as shown below.

- Display Order: Allows you to specify the display order in which the exclude reason should appear in the drop-down list while screening. For example, if you have 20 reasons and want this reason to appear on the top, then add 1. The reason will appear at the top in the Select an exclude reason drop-down list.
- Enable: Toggle the button to enable or disable the reason. By default, the reason is enabled when you add. When you disable, the reason will not appear in the drop-down list.